How to configure the Edge Gateway (Firewall & NAT rules) in Performance Cloud VMware (NSX-T)
TABLE OF CONTENTS
- Requirements
- Important Notes
- Definitions
- Locate the Edge Gateway external IP address
- Define Custom Applications
- Configure a source NAT (SNAT) rule
- Configure a firewall rule for SNAT
- Create a destination NAT (DNAT) rule
- Configure the firewall rule for DNAT
- Multi-Network Scenario
- Egress filtering
Requirements
- To configure firewall rules, IP Sets are required. If you haven't created your IP Sets yet, please follow this article for guidelines.
- To proceed with this guide, we assume that required virtual networks are already in place. If it is not the case yet, please follow this article to create required virtual networks.
Important Notes
- If more than one (1) WAN IP address is required in your virtual datacenter, please contact our Cloud Support team. Additional fees may apply.
- Applications with more than one (1) port cannot be used for NAT configuration. However, those applications can be used for firewall rules.
- Please be careful when configuring DNAT rules with "ANY" for the source port. That configuration is used for a one-on-one (1:1) translation of one (1) WAN IP address to one (1) LAN IP address. Without a dedicated WAN IP address, that DNAT configuration can be in conflict with your Site-to-Site VPN configuration.
Definitions
CIDR or "classless interdomain routing" is the simplified way to describe a network and its subnet mask with its binary value. Example: the network 192.168.1.0 with the subnet mask 255.255.255.0 is, in CIDR notation, 192.168.1.0/24
What is an Edge Gateway?
An edge gateway connects a routed organization vDC network to external networks. It provides services such as load balancing, network address translation, virtual private networks (VPN) and a firewall.
Locate the Edge Gateway external IP address
- Login to the Performance Cloud VMware portal using your credentials.
- Select your virtual datacenter.

- Under the Networking section, click on Edges. Then, click on your edge gateway.

- Click on IP Allocations, then locate your allocated IP(s)
206.72.116.28 is the primary WAN IP address in this example.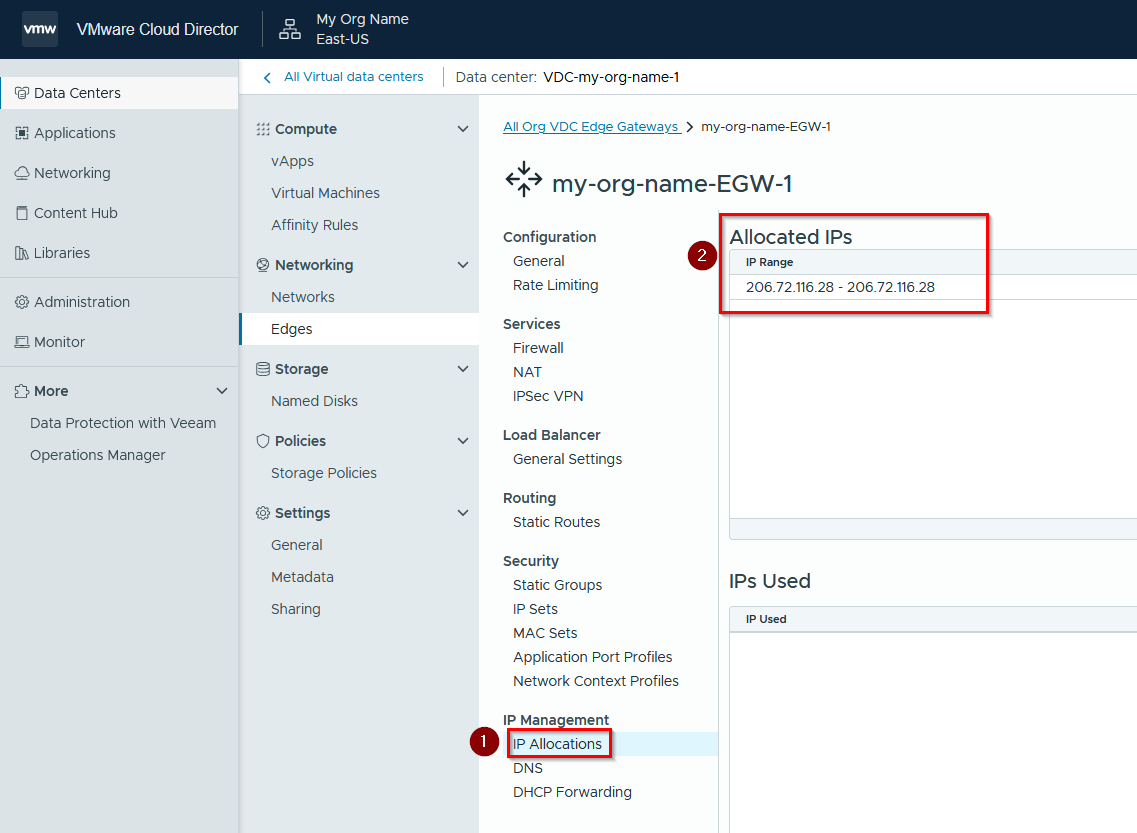
Define Custom Applications
More than four hundreds (400) applications are built-in in Edge Gateways.
You can also create custom applications. Useful to create firewall rules with custom ports.
- Still in your Edge Gateway settings, go to the section named Application Port Profiles and click on NEW

- Enter the application name and description.
Select the protocol and enter the required port(s).
Then, click on SAVE.
Configure a source NAT (SNAT) rule
To change the source IP address from a private to a public IP address, you create a source NAT (SNAT) rule.
Example below to translate a single private network to the primary WAN IP address.
- Under the Networking section, click on Edges.
Then, click on your edge gateway.

- Go to the NAT section and click on NEW.

- Configure a SNAT rule as following:
- Enter the desired rule name.
- Optional – Enter a description.
- Change the interface type to SNAT
- Enter one of the available external IP addresses for the External IP field.
- Enter the desired Internal IP or range for the SNAT rule.
- Open the Advanced Settingssection :
- Make sure the rule is enabled
Then, click on SAVE

- The new SNAT rule should look like this:

Configure a firewall rule for SNAT
- Go to the Firewall section and click on EDIT RULES

- In the new window, click on NEW ON TOP

- Edit fields of the new firewall rule as following:
- Name: Name your firewall rule (Example: Allow-S_10.0.1.0-D_ANY)
- Source: Click on the pencil to select the source for this firewall rule. Then, click on KEEP.
In this example, the IP Set named PROD-LAN is selected.
- Destination: Click on the pencil to select the destination for this firewall rule. Then, click on KEEP.
In this example, the Any Destination value is chosen to allow all outgoing traffic.
- Action: Choose between Allow or Drop
- Name: Name your firewall rule (Example: Allow-S_10.0.1.0-D_ANY)
Then, click on SAVE.
4. The new firewall rule should look like this:
- Test internet from your VM with a ping.

Create a destination NAT (DNAT) rule
To change the destination IP address from a public to a private IP address, you create a destination NAT (DNAT) rule.
In the example below, we will open a custom port for a single IP address to access a virtual machine through Remote Desktop.
- Under the Networking section, click on Edges.
Then, click on your edge gateway.

- Go to the NAT section and click on NEW.

- Configure a DNAT rule as following:
- Enter the desired rule name.
- Optional – Enter a description.
- Change the interface type to DNAT
- Enter one of the available external IP addresses for the External IP field.
- Enter the external port
- Enter the desired Internal IP address
- Select the application (local port)
- Open the Advanced Settingssection:
- Make sure the rule is enabled
Then, click on SAVE
- The new DNAT rule should look like this:

Configure the firewall rule for DNAT
- Go to the Firewall section and click on EDIT RULES

- In the new window, click on NEW ON TOP

3. Edit fields of the new firewall rule as following:
- Name: Name your firewall rule (Example: Allow-RemoteOffice-RDP-SERVER01)
- Applications: Click on the pencil to select the application(s) for this firewall rule. Then, click on SAVE.
In this example, both RDP appplications were chosen (the custom and the default ones)
Note: a filter was set to only show applications named “RDP”
- Source: Click on the pencil to select the source for this firewall rule. Then, click on KEEP.
In this example, the IP Set named Remote-Office is chosen.
Note: Whenever it is possible, we do not recommend putting “Any” here for security and performance reasons.
- Destination: Click on the pencil to select the destination for this firewall rule. Then, click on KEEP.
In this example, the IP Set named Server01 is chosen.
- Action: Choose between Allow or Drop
Then, click on Save.
- The new firewall rule should look like this:

- Test new rules.
In this example, we can now initiate a remote desktop connection from the office having the authorized IP address.
Multi-Network Scenario
For a more robust environment, we suggest implementing network segmentation and segregation. The goal is to isolate and restrict access to sensitive information.
In the example below, we have a database server on a separate network. All ports are closed from the Web server except the SQL port. This configuration reduces the surface attack for the database server.
Here is the necessary firewall and NAT configuration in the Edge Gateway to achieve this scenario:
Please note that firewall rules are applied in the order in which they exist in the rules table. If necessary, the rules can be moved in the correct order without having to recreate them again.

In this example, “NO SNAT” rules were created to prevent translating internal IP addresses between the WEB network & the DB network.

Egress filtering
For a more robust environment, we also suggest considering the implementation of ports egress filtering.
You could consider blocking outbound ports or services known to be used for malicious purposes.
Also, some ports or services don't typically need to be available across the Internet and are usually reserved for internal networks. Some of those services can be associated with vulnerabilities or malicious activity.
The decision to block these ports or services must be made with knowledge of your network's requirements.
Example: