Phase1 - Required migration for Veeam Cloud Connect Backup (VCC-B)
TABLE OF CONTENTS
Description
Here are steps to complete following the reception of an email sent by Sherweb in December 2024 about the required migration for Veeam Cloud Connect.
Important Notes
- For customers with multiple affected VCC-B tenants for this migration, this procedure must be completed for each tenant.
- For Veeam Agent for Windows, please follow this procedure: https://helpdesk.sherweb.com/en/support/solutions/articles/67000742190-windows-agents-only-steps-to-be-completed-by-tenant-following-reception-of-the-first-email
Procedure for backup jobs
Rescan the Service Provider
- Login to your Veeam Backup & Replication (VBR) server
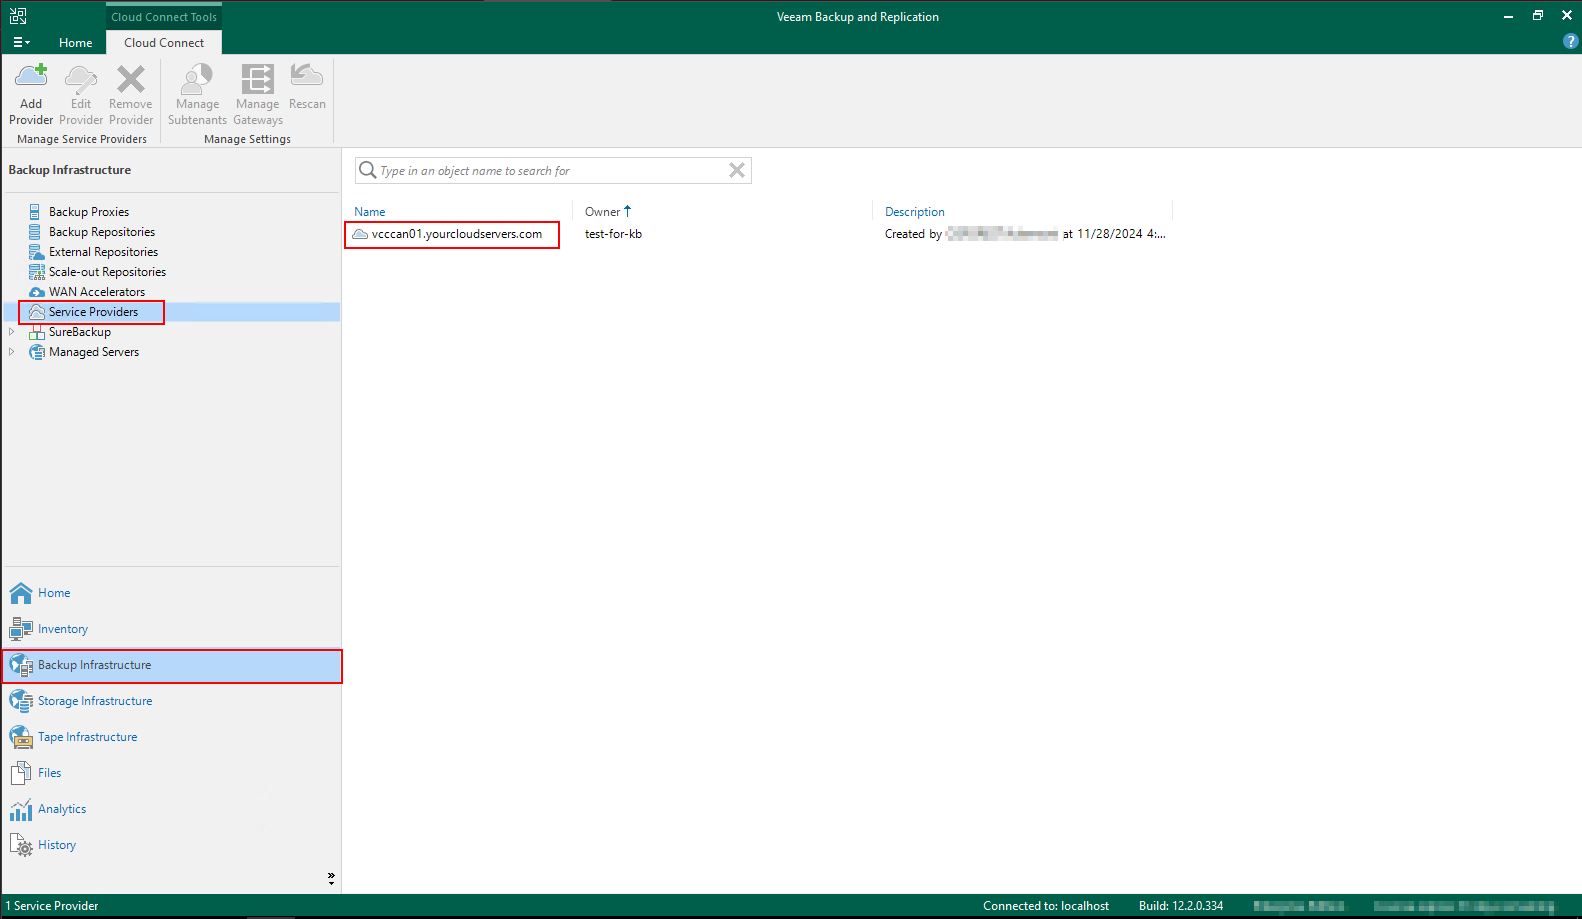
- Navigate to the Backup Infrastructure section and click on Service Providers.
- Locate your Veeam Service Provider (VSP) pointing to Sherweb's cloud infrastructure.
If you have multiple VSP, ours can easily be identified by its Name. It will either be:- vccan01.yourcloudservers.com
- gw.ca.vspc-cloud.com

- Right-click on the service provider and select Rescan.

- Once the rescan completed, still in Backup Infrastructure section, click on Backup Repositories and confirm the new repository is shown.
It will have the name “CAE2-SOBR-01” and the type will be “Cloud”.
Locate the job(s) targeted at Sherweb’s Cloud repository
- Navigate to the Home section and select Jobs.
- Identify the job(s) targeting the Cloud repository.
- If you need to validate the name of the repository, you can go back in Backup Infrastructure section, the select Backup Repositories and look under the column Host and search for the following hostnames: “vccan01.yourcloudservers.com” or “gw.ca.vspc-cloud.com”.
The identified repository’s name will be the one displayed in the job details. - If you have multiple jobs targeted at your Cloud repository, you can sort the job list by Target.

- If you need to validate the name of the repository, you can go back in Backup Infrastructure section, the select Backup Repositories and look under the column Host and search for the following hostnames: “vccan01.yourcloudservers.com” or “gw.ca.vspc-cloud.com”.
Clone existing backup job(s) you previoulsy identified and set the new cloud repository as backup target
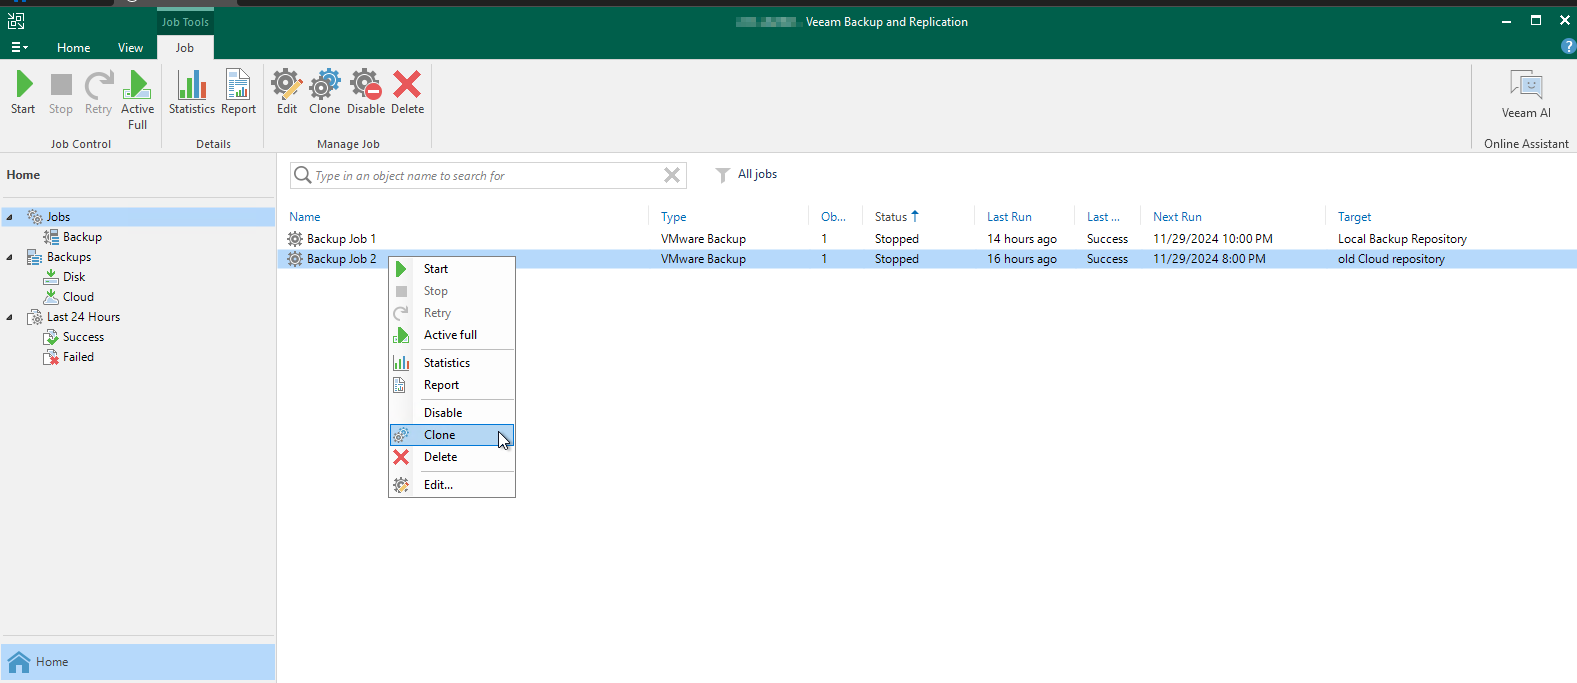
- Still in Home / Jobs, right-click on the job name and select the option Clone.
- This will create a new job with the exact same settings as the original one, but will allow us to change the Storage settings since it is not bind to any backup chain

- This will create a new job with the exact same settings as the original one, but will allow us to change the Storage settings since it is not bind to any backup chain
- Right-click again on the original job and select the option Edit.

- In the Name section, add the suffix “_old” to the job name to help identify it in further step

- In the Schedule section, uncheck the option “Run the job automatically” and click Finish.

- Still in Home / Jobs, right-click on the newly cloned job name and select the option Edit.

- In the Name section, replace the suffix “_clone1” that was automatically generated upon creation to the job name with “_new”.

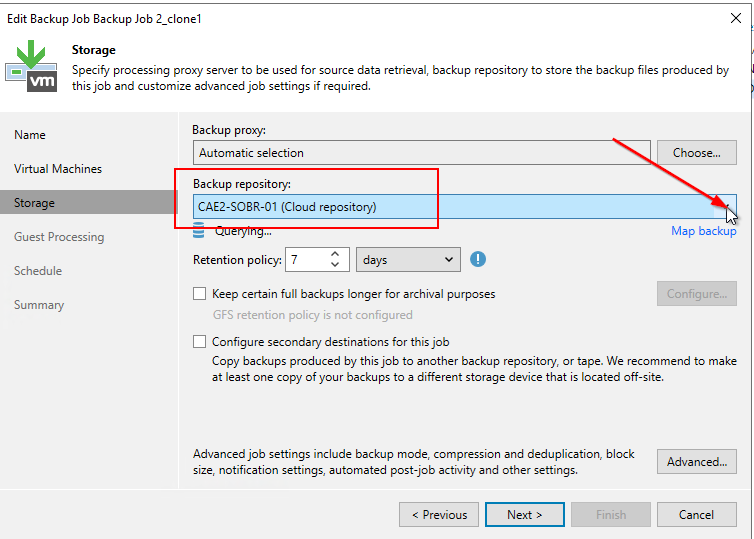
- In the Storage section, change the Backup repository option from the drop-down menu and select the newly discovered Cloud repository. Then, click Next until the configuration completes.

- Right-click again on the job you just cloned and select the option Disable which should already be checked

- At this point you have the choice to either, wait for the scheduled time to start the new job or starting it manually
Cloning of Backup Copy jobs
- Follow the two first steps:
- Follow the third step (Clone existing backup job(s) you previoulsy identified and set the new cloud repository as backup target) except that you will replace the subtask where you uncheck the option “Run the job automatically” by simply disabling the original Backup Copy job to prevent further data transfer.
Next steps
The result should look somewhat like the screenshot below, where you would have for each job or copy job: one (1) job pointing at the new Cloud repository and being scheduled, and one (1) job pointing at the old Cloud repository being disabled or not scheduled.
Don’t forget to send us the asked information by email.
As mentioned in the email, a second email will be sent once the old data has been deleted or migrated (with new instructions to follow).
